3D Reinforcement Detailing in Revit Software

There are several ways through which the users can get efficient #D reinforcement detailing with the help of the Revit software, which are as follows:

Including hook and end treatment in reinforcement
While adding hooks or end treatments to the reinforced bars, the rebars' behaviour has changed. This feature can also be changed by the Revit features, and this can be done by following several steps:
➢ At first, the users have to go to the structure tab, then click on the reinforcement option. This shows reinforcement settings, from which General has to be selected.
➢ In the next step, the user has to check the hooks in the rebar shape definition. In addition, the users have to make sure that there is no rebar that has been placed in the project.
Making a valid rebar host
Users are able to create a valid Rebar host with the help of the Revit software. The elements of the rebar host should belong to the structural category. In addition, there should be material for the model behaviour in the family set. The users can ensure if the element is a valid host or not by following several steps, which are:
➢ At first, the users have to select the element, and then they have to check if the contextual ribbon shows a rebar icon or not.
➢ In the next step, the user has to launch the rebar placement.
➢ In the next step, the user has to select the rebar and then has to click on the pick new host option and also has to try to select the element. In the case of the element that has been selected, it has been considered as the valid host.
Finding the rebar hosts
To find the rebar host, the user has to select the rebar and use the select host command within the ribbon.
Controlling concrete covers with the help of Element face
The users are also able to control the concrete cover in the Revit software, which helps to ensure that the bars have been protected from corrosion while they are being fitted on the construction site. Users are able to set the concrete covers for various types of element faces on the basis of the element types.
To set the concrete cover in the Revit software, the users have to click on the structure tab, go to the reinforcement panel, and then click on the cover option. In the next step, the user has to select the pick faces command from the options bar, click on the element faces as per their design requirements and has to select the cover settings from the drop-down menu in the options bar.
Editing the appearance of the concrete cover lines
The appearance of the concrete cover lines can also be edited by the users in the Revit software. In this context, the users have to go to the manage option. Click on the object styles, and then click on the annotation objects tab. In the next step, the user has to find out the rebar cover references category and thus can edit he concrete cover lines, including its colour, weight and pattern.
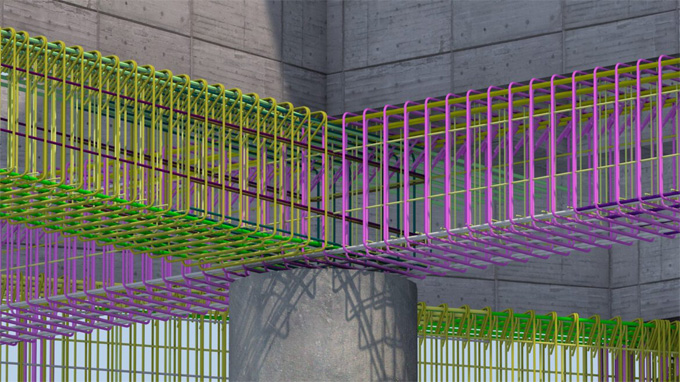
Realistic representation of the rebars
With the help of the Revit software, users are also able to get a realistic 3D representation of the rebars, and this can be done by setting the bars to be displayed as solids.
Key benefits of using Revit software for the reinforcement detailing process
Using the Revit software is beneficial for performing the reinforcement detailing process. The key benefits that have been achieved by using Revit software are as follows:
Increasing design efficiency
The Revit software has the ability to change design models automatically, as well as automatically update all the relevant documentation, thus reducing the chances of rework and saving the time of the users.
Maintain consistency and accuracy
The Revit software helps to derive all drawings from the BIM models, which helps to ensure that those drawings remain accurate, as well as align with the project requirements. The Revit software also has the ability to automatically update the rebar layouts and schedules, which helps to reduce the risks of manual errors.
Improving coordination
The Revit software has the ability to integrate with architectural and MEP models, which helps to detect clashes in the designs and improves multidisciplinary coordination.
Improving communication
The visualisation of the design models has been improved with the help of the Revit software, which helps to improve the communication between the project designs and the project team members.
Providing 3D visualisaion
With the help of the Revit software, the reinforcement has been placed into the design models. This 3D visualisation feature helps to reduce ambiguity, as well as helps to ensure constructability.
To learn more, watch the following video tutorial.
Video Source: Balkan Architect
Automation feature
The Revit software also helps to automate the generation of the shop drawings and bar bending schedules. This automation feature of the Revit software helps to save drafting time for users.